Novel Plotting Methodology Overview (Use Your Story Structure of Choice)
Novel Plotting Methodology Overview
This plotting methodology is a way of creating a plot that is structured, yet flexible, to produce an output you can use as the skeleton for a novel. It is far more than a set of tips as it manages the process of plotting out a novel. Use this methodology with whatever techniques you would like to use for narrative structure, creating characters, building conflict, etc. The methodology helps to bind these things together.
I’ve broken down the plotting methodology into 5 major stages. The first three stages are about brainstorming or ideation in Design Thinking speak. The last two are about detailed plotting and actually doing the writing of the story.
The Plotting Methodology Stages
1. Story Concept
2. Determine Initial Ending
3. Create an Outline
4. Create Plot Cards
5. Writing Chapter & Outline Next Chapters (repeat until done)
 |
| Plotting Methodology Phases and Stages Diagram |
Brainstorming Phase
This phase is where your novel begins. This is where a cool idea or a concept takes hold and is grown. Throw all your ideas in and then some. Be grandiose and put them all down. You thin it out later. Use brainstorming techniques like stickies on the wall, drawing, etc.
1. Story Concept
Shape the concept of the story by determining how it should be shown or represented, what action should occur, setting, major scenes, major characters, character growth, how it should end, etc. This should be the fun part as it is ideas and ideas are cheap!
2. Determine Initial Ending
Work on the ending. Don’t just say it should end like this, kind of, maybe. Make an ending, make multiple endings, but pick one. Endings can always change later, but not too much later. It should be pretty firm by the time stage 4, Create Plot Cards, is finished. Having the ending forces other things in the story to be in place to working towards the ultimate goal. Determine which characters are at the ending, what happens, what happens to the characters or world afterwards.
3. Create an Outline
Start ordering the events in the story. If it isn’t already structured in chapters, then combine related events into a chapter. Use bullet points and sub-bullets or stickies on the wall in rows and columns.
A first outline should be a list of single sentences or items. A second iteration(s) of the list should produce an outline with chapter names or number that describes what happens in them in a sentence or two (grouping initial outline items together). In a way, the first draft of the novel is being quickly written at a high level. Change things as needed. The concept or ending can be changed too. Characters can be fleshed out developed, they can be added or killed or written out, their paths changed, the story flow modified, etc. This is the best time to change things as it is easy at this point. This is still a brainstorming exercise. A rough product is being delivered out of this in iterative cycles and it is progress!
The outline is the prototype of your novel so if it doesn’t work, you create another prototype and keep working until finished. It is way more productive to fix things at this point then it is to rip apart written chapters and redo things. You want to keep delivering in short time frames of days / weeks to keep up momentum. Don’t forget about narrative structures like the Three Act Structure, Freytag's Pyramid, Hero’s Journey, or any other patterns for laying out a story.
How to Outline a Story or Novel
IMPORTANT: You should have character profiles at this point and a general timeline. These are necessary as you should have a good idea about character appearance, their personalities, quirks, abilities, and history. You can make up some stuff as you go along, but core elements should be there. You can also determine character and story arcs. Remember good characters can carry a mediocre plot, but bad characters will kill a good plot.
Iterative Plotting and Writing Phase
Note that this is the ITERATIVE Plotting and Writing Phase. This means you will repeat these stages until you are finished. It doesn’t just happen once. On the diagram you see it loops back on itself.
You create plot cards as a more detailed version of the outline. After the plot cards are created, then start writing. Write the beginning, something in the middle, or even the ending, but know that the voice of the story won’t get established until a few chapters get written, so it is likely that they will need revision or a rewrite in the case of the ending.
The brainstorming phase delivered an outline that allows you to continue developing your story with a firm vision and idea of what you are going to write. There is no uncertainty as you don’t know how long the novel will be or what will happen, or worst yet, you write yourself into a corner and have to rewrite. You have hopefully exposed some weaknesses and inconsistencies by the time the outline is done.
4. Create Plot Cards
The first thing that happens in the iterative plotting and writing phase is the creation of plot cards. This is where you tie the things together from the outline, the character profiles, and the timeline and add more detail. Think of this as a more detailed outline, but it firms up what happens in the story more and remember, it is iterative, which means it can change over time. Most writers get more ideas to enhance the story as they work on it so this is natural.
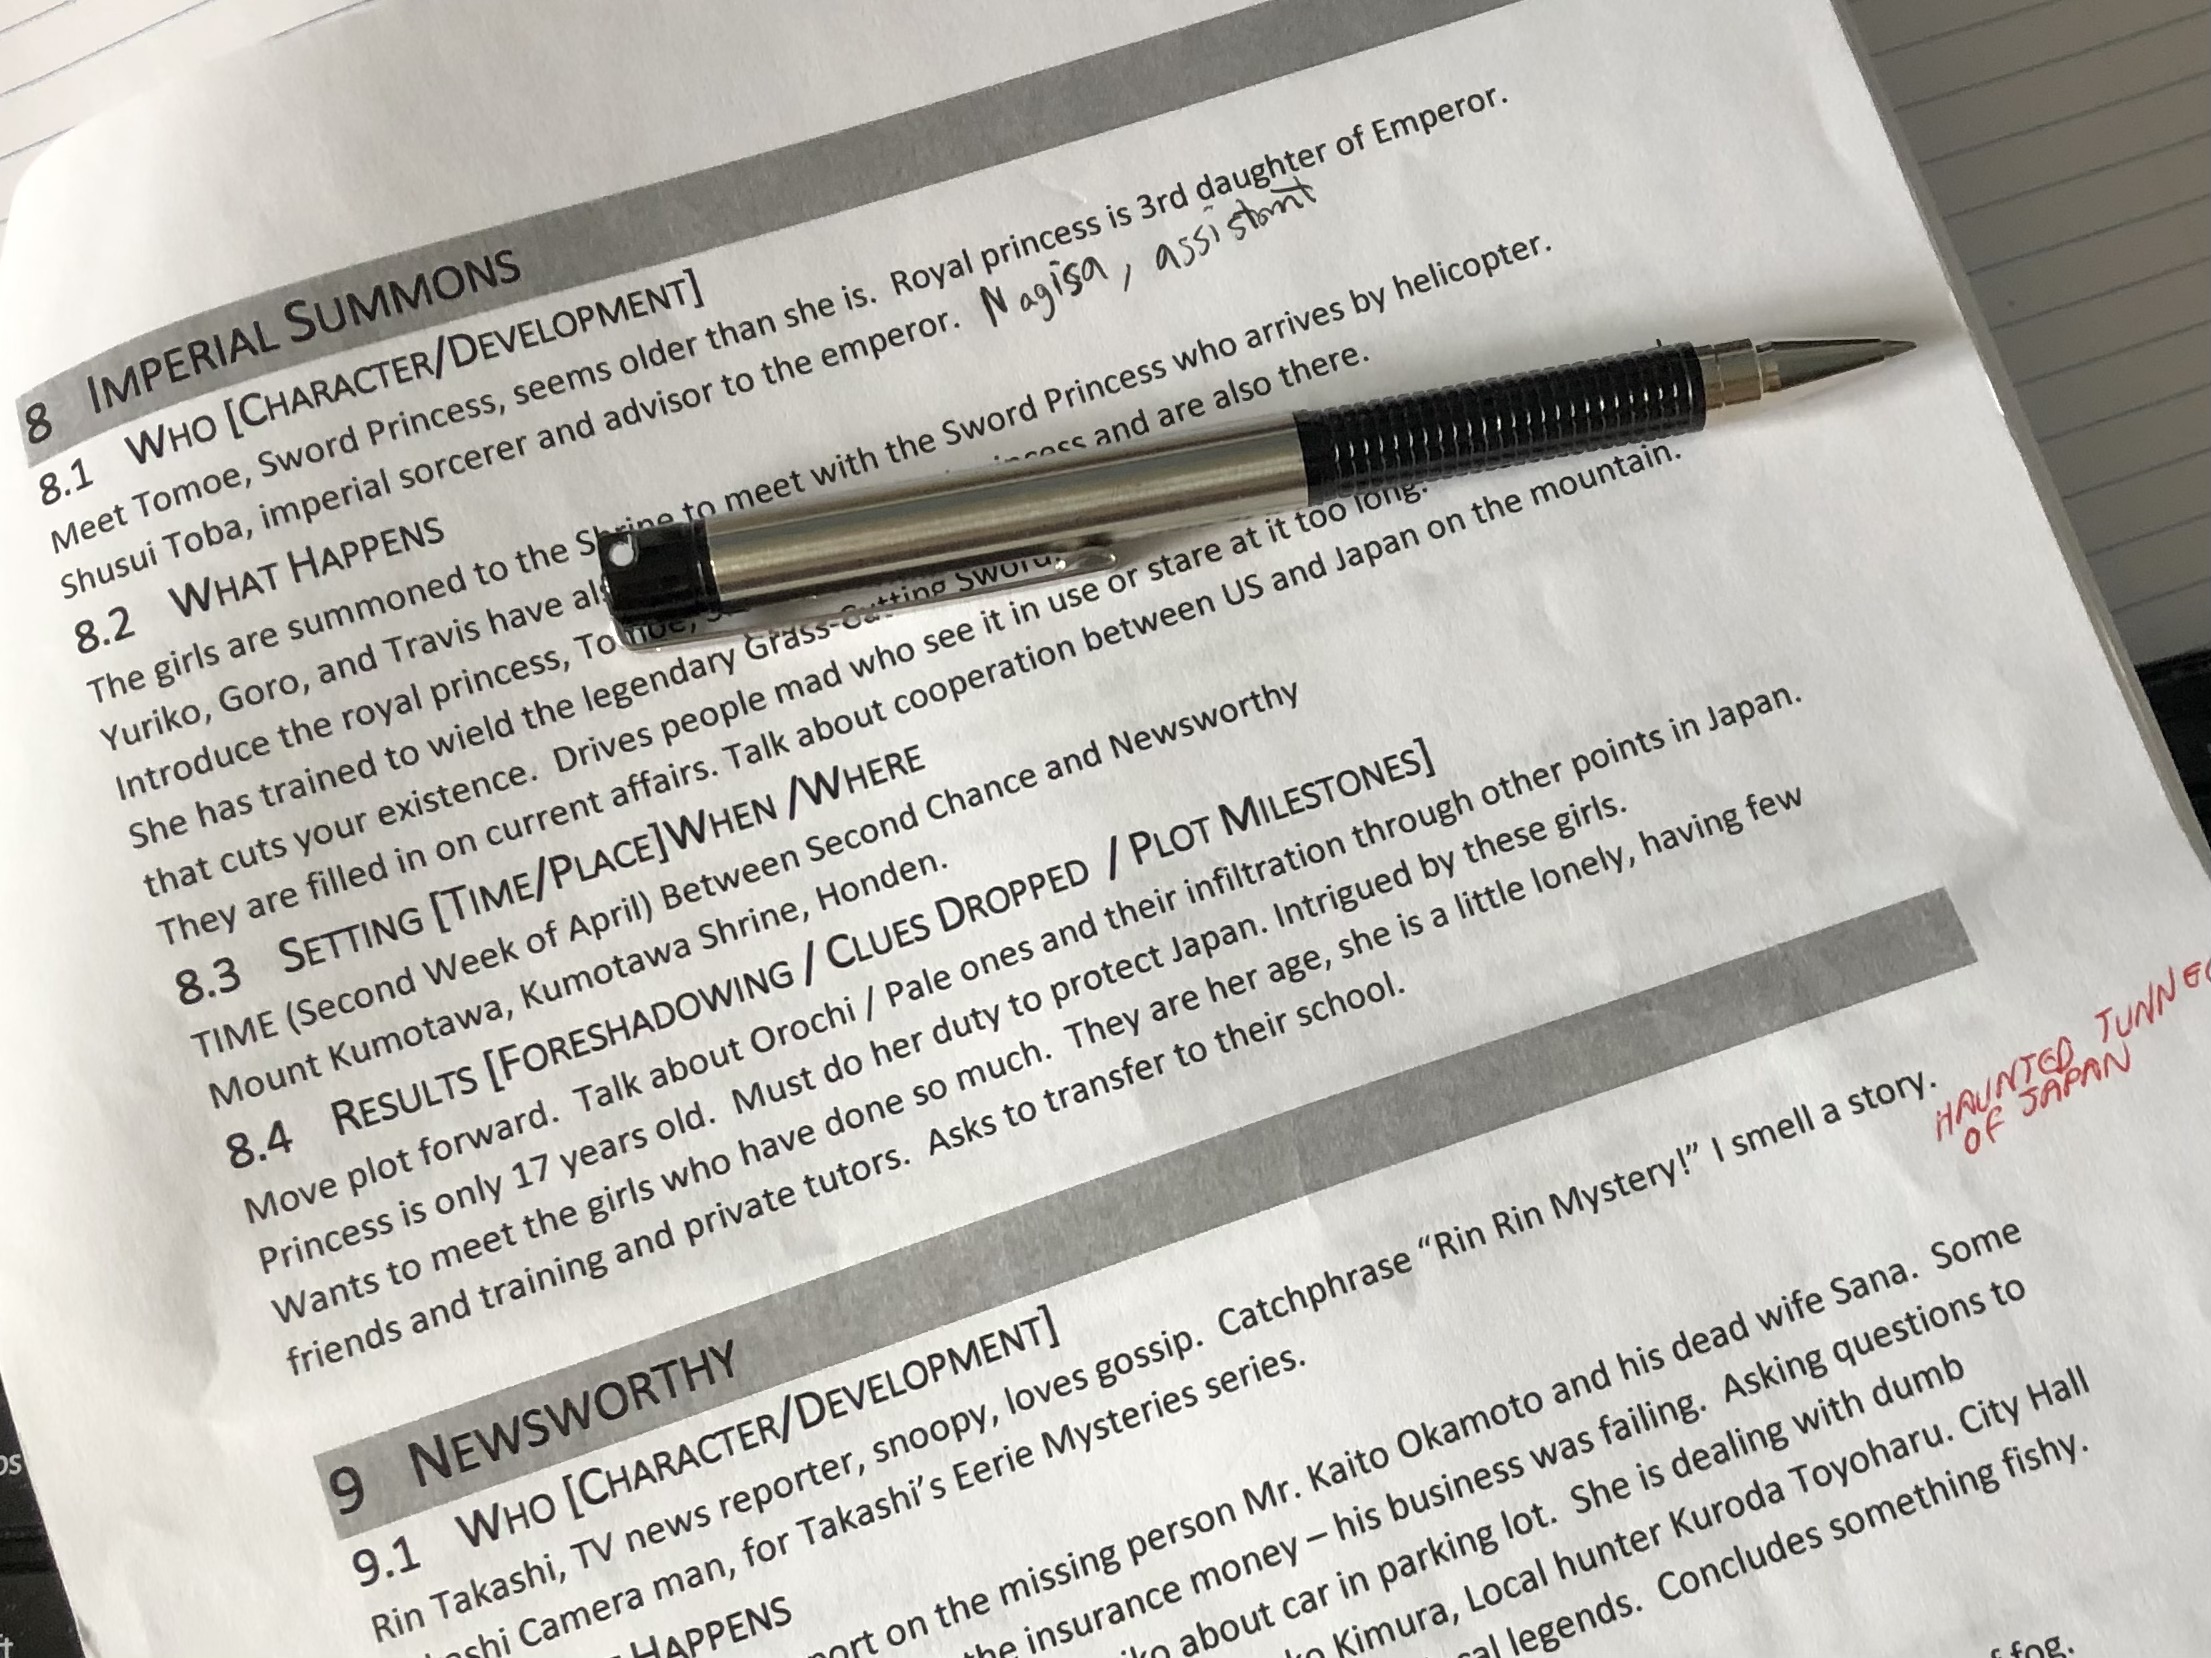
A plot card should describe the chapter with who, what, when, where, why, the 5 Ws from classical business analysis. It should also fit on a handwritten index card (thus plot cards) or 1/2 an 8.5 x 11 page if typed up. Make the plot cards what you want and choose the size you want. It is supposed to be in point form but not completely detail out the chapters.
My plot cards contain (one per chapter):
Who [Character/Their Development]
What Happens
Setting [Time/Place]
Results[Foreshadowing/Clues Dropped/Plot Milestones]
Plot Cards basically replace your outline after initial creation and you no longer need any of the artifacts/documents created in the brainstorming phase other than the character profiles and timeline.
Note: If you ever have to stop working on the novel, you can come back and pick up where you left off with some review — a nice side perk of this methodology.
5. Writing Chapter & Outline Next Chapters
This is where the real work takes place. Writing the actual chapters and writing programming code are similar in concept. Words are being put onto the page and the story will be eventually communicated to readers. This methodology doesn’t help with writing, but it shows what needs to be written for the chapters. This part is pantsing as it is mostly creativity tempered with technique, writing style, and writing ability. Chapters can also be revised as you go.
Steady, periodic delivery is desired here, major editing/revisions should wait until the novel is done or a break is needed. Chapters should be produced on a regular basis to show progress. Don’t take weeks or a month to deliver a chapter.
When a chapter is being written, the next two to three related chapters should be outlined in more detail again. Take the contents of the plot card, dump it into the empty page of the chapter. Convert to pure bullet point. Detail out exactly what happens in point form. Outlining chapters in advance this way ensures that more thinking has gone into what will happen, how it would flow, and what else might be needed. When you get to the next chapter, there is an outline there already and you just replace the bullet points as you write them out for real.
This is an iterative process, so it is repeated again and again for every chapter until done. There is even the potential of plot cards being revised. Doing this uncovers additional weaknesses (aka it doesn’t work) in the story and allows additional story / character changes to be made without rewriting the book as they are uncovered earlier. I have added characters / references to them / and even inserted bridging chapters to fix things, often before the chapter was written.
Finishing
When your last chapter is written, congratulations on a significant achievement. An idea of a novel is easy, writing it is the hard part!
Recap
This methodology firms up what you are going to write and it reduces the risk that is inherent in a purely creative process. Risk reduction is important, but it takes work to do. However, it is likely that there is more work involved with rewriting something that doesn’t work or wasn’t the artistic direction you wanted to go. The worst risk that could happen is that the writing project is abandoned as it was too time consuming and demoralizing.
Once again, the plotting methodology produces five main outputs. Do you think these would help your writing?
1. Know what your ending is.
2. Know what you are going to write.
3. Know how many chapters you are going to approximately write to get to the end.
4. Know how long you are going to take to finish writing.
5. Reduce risk so you don’t have to rewrite your novel halfway through. TIP: An excellent way to reduce risk is to tackle the hardest parts or most uncertain parts early to determine the actual difficulty.
See My Stories
How to Outline a Story or Novel
Plotting versus Pantsing - My Novel Plotting Methodology Answer
Follow me on Twitter or Instagram at @Tostzilla or my feedburner.
More snacks, ramen and Japanese pop culture.


Comments
Post a Comment